Nokedli (Hungarian Dumplings)/Spaetzle

I had the good fortune of growing up in a family that loves food. We love everything about it – shopping, finding new things to try, cooking, serving and of course, eating.  Part of this love comes from my mom, Gwenae, who is a great cook, and her Hungarian heritage.  Growing up, I remember enjoying these dumplings more than any other Hungarian dish. They are called Nokedli in Hungarian and Spaetzle in German.  No matter what you call them, they are delicious and easy to make.

I love serving these with pork chops, grilled chicken and stews and in place of egg noodles.  Nokedli is the standard accompaniment with one of Hungary’s best known dishes, Chicken Paprikash. Everything you need to make them is already in your kitchen – flour, salt, water and eggs.  Once they are cooked i like to cook then on a pan with a little butter and my mom said her mom used to serve them with melted muenster cheese on top. Give these a try when you want serve something different with dinner.

Ingredients

2         Eggs, lightly beaten

½ tsp  Kosher salt

¾ c     Warm water

2 c      Flour

2 tbs   Butter

1 tsp   Parsley (fresh or dried)

Directions

In a bowl, combine the eggs, water, salt and half the flour, mixing gently.  The dough should be soft and sticky, a bit thicker than gravy but not as thick as pancake batter.  You can add more flour if needed and discard the rest if your dough is the right consistency.

The key to this super simple batter is to let it rest for at least 15 minutes.

In the meantime, bring a large pot of salted water to a boil.

If you have a spaetzle maker, pour the batter into the basket and move it back and forth to drop the dough through the holes into the boiling water. (Click here to see the great one I bought at Bed, Bath & Beyond for less than $10.00. Not an ad, just a fan.) If you don’t have one, you can put the dough on a large spoon and drop small amounts into the water.  A flat panel grater would work well too.

The dumplings are done when they float to the top, about three – four minutes. 

Drain them into a colander and return them to the pot, cooking with the butter till coated.  Transfer to a bowl and top with parsley.  

Italian Wedding Soup

I love making soup and when it’s cold out, I usually make a big pot each week.  Chicken soup is always a go-to for me but I’ve challenged myself to make a new soup each week to expand my recipe list.  This week my daughter Grace asked for Italian Wedding Soup which is a clear broth with veggies, pasta and little meatballs.  (I think it was the meatballs that caught her attention).  The meatballs cook in the oven while the soup comes together and everything was ready in about an hour.  It was a great, hearty lunch on a cold Monday!

I usually have homemade stock in the freezer but if I use store bought stock (Swanson’s low sodium is my favorite) I always add either one packet of Knorr’s Stock Base or some Knorr’s Bouillon powder.  Normally Italian Wedding Soup calls for spinach but I had only kale on hand so that’s what I used.  Since kale can be tough (but still delicious) I cooked it with the other veggies to soften it up before adding it to the soup.  If I had a zucchini on hand, I would have added that, too.  Any small pasta will do and I used small bow ties which I find are great for soups.  A little sprinkle of cheese on top and red pepper flakes (for me) and you are good to go.

Give it a try!

Ingredients

Meatballs

½ lb.             Ground pork

½ lb.             Ground beef (I used 85/15)

¼ c               Grated parmesan

¼ c               Bread crumbs

1                   Egg (lightly beaten)

½ tsp            Seasoned salt

Soup

½ c              Diced onion (I always use a sweet onion like Vidalia)

1 c                Diced carrots

1 c                Diced celery

2 tbs            Olive oil

8 c                Chicken stock (see my recipe for homemade; see note above)

1 tbs            Chicken bouillon powder (see note above)

½ c               Dry white wine (I used Pinot Grigio)

1 c                Small pasta (I used small bow ties)

6 oz              Chopped kale (remove the hard stalk in the middle of each leaf) or spinach

                     Salt and pepper to taste

Directions

Preheat your oven to 350.

In a large bowl, combine all the meatball ingredients and gently mix until everything is incorporated.  I find the best way to roll a meatball is with my hands so dampen your hands with water so the mixture doesnt stick and roll about a teaspoon sized portion into a ball.  Place on a baking sheet (I always line mine with parchment paper to avoid food sticking) and cook the meatballs at 350 for about 30 minutes or until done.  Remove the meatballs from the tray and set aside on a plate.

While the meatballs cook, sauté the onions, carrots, celery and kale on medium heat in the olive oil till almost tender which will take about 10 minutes.  (If you are using spinach instead of kale you can add it when you add the pasta.  I cook the kale first since it can be tough and cooking it first help soften it). 

Add the white wine and cook for one minute and then add the stock (and bouillon powder if store bought).  Cook for one minute until combined and the soup comes to a simmer.  Add the pasta to the soup and cook till tender, about six minutes.  Add the meatballs and simmer for another minute or two. 

Serve with some grated parmesan on top.

Enjoy!  

Peanut Butter Hearts (Cups)

My family never met a piece of chocolate they didn’t like – ever.  My husband and kids are self-diagnosed chocoholics (I would rather have a bag of gummi bears!).  Doesn’t matter if it’s milk, dark or white or if it’s plain or has nuts.  But the one combination that will always be at the top of their list is chocolate and peanut butter.  Peanut butter cups (you know the ones!) are the first candy I buy for Valentine’s Day, Easter baskets, Christmas stockings, Halloween or just as a treat and they never last very long.   With Valentine’s Day around the corner, I wanted to make my own and see if it’s as easy as I thought.  How hard could it be? Not hard at all as you only need three ingredients and most people probably have all three in their kitchen right now – chocolate chips, peanut butter and powdered sugar.  That’s it!  They may be easy, and don’t take long, but they can be a little messy until you get a few under your belt but the mess is worth it as they are delish. 

I used a silicone heart shaped mold for the peanut butter cups but you could also use a mini-muffin mold or regular sized cupcake mold.  I highly recommend using silicone as it’s so easy to work with and the peanut butter cups pop right out but if you don’t have one, you can use cupcake liners in a regular tin and the cut the excess off after they are set.  Other than that, you’ll need a glass bowl and spatula to melt the chocolate, a small zip top bag, a small spoon and a brush (I used a small paint brush).  To help cut down on the mess factor, I used a small muffin scoop to get the chocolate into the mold since it releases the chocolate easily.

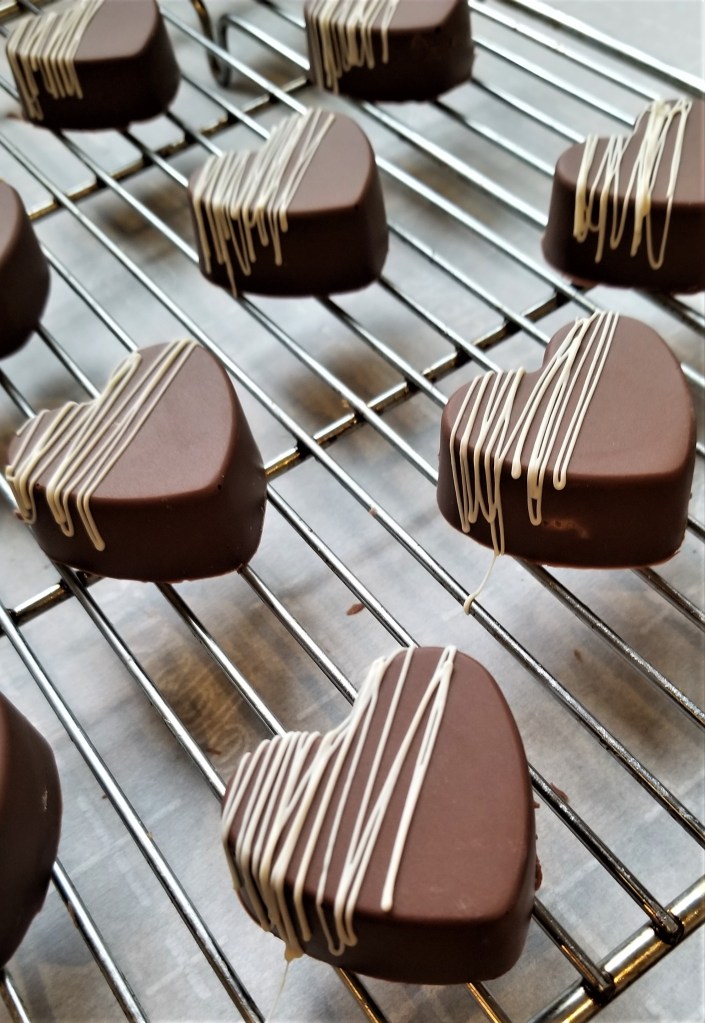
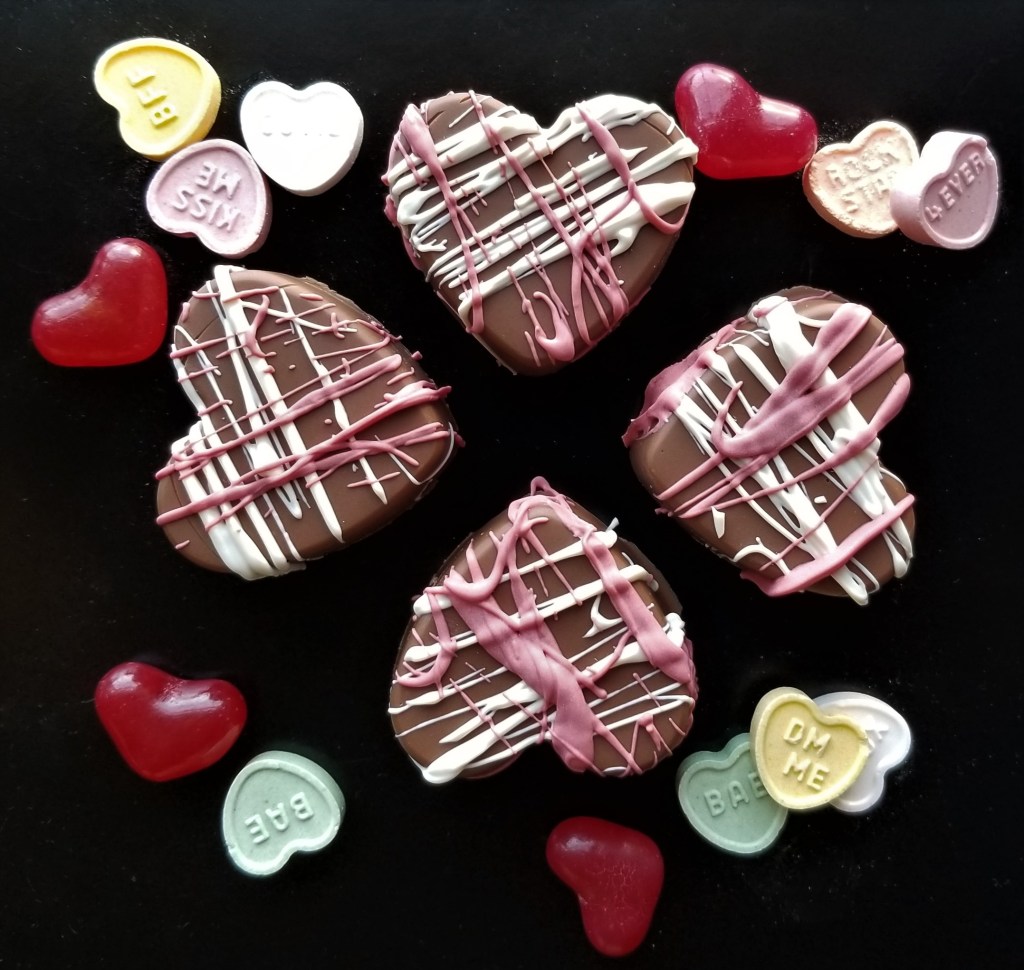
In terms of chocolate, I went with milk chocolate chips.  I had them on hand and overall chocolate chips are super easy to work with.  You could also use candy melts (meltable disks you can find in the baking ails at craft or baking stores.) I didn’t go with high end chocolate but if you want to, that’s fine too, but would check the package for melting instructions just in case. The candy melts are great for decorating and melt very easily in the microwave (50% power for 20 seconds at a time and stir in between).  I drizzled some white on one batch and pink and white on another. 

Click here for the Wilton mold I used (not an ad) and from this recipe I made 24 peanut butter cups.  Also, to make the mold easier to work with, I cut it in half so I could do 12 peanut butter cups at a time. I highly recommend this.

What chocolate lover wouldn’t like a box of homemade peanut butter cups for Valentine’s Day, a birthday, anniversary or just for fun?

Ingredients

2 10oz bags              Chocolate chips (I’m a Nestle fan; used milk chocolate but semi-sweet or dark work well).

¾ cup                      Peanut butter (I use Skippy smooth. Crunchy PB is fine or even another nut butter)

4 tbs                        Powdered sugar

1 cup                       White, pink or red candy melts for decoration

Directions

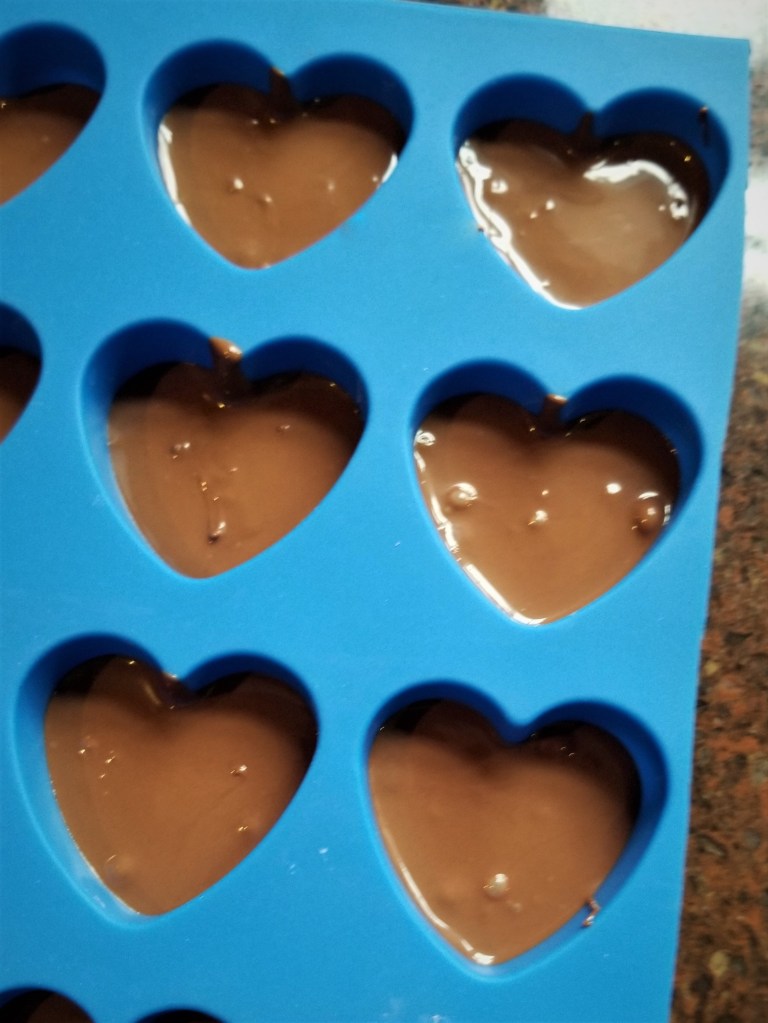
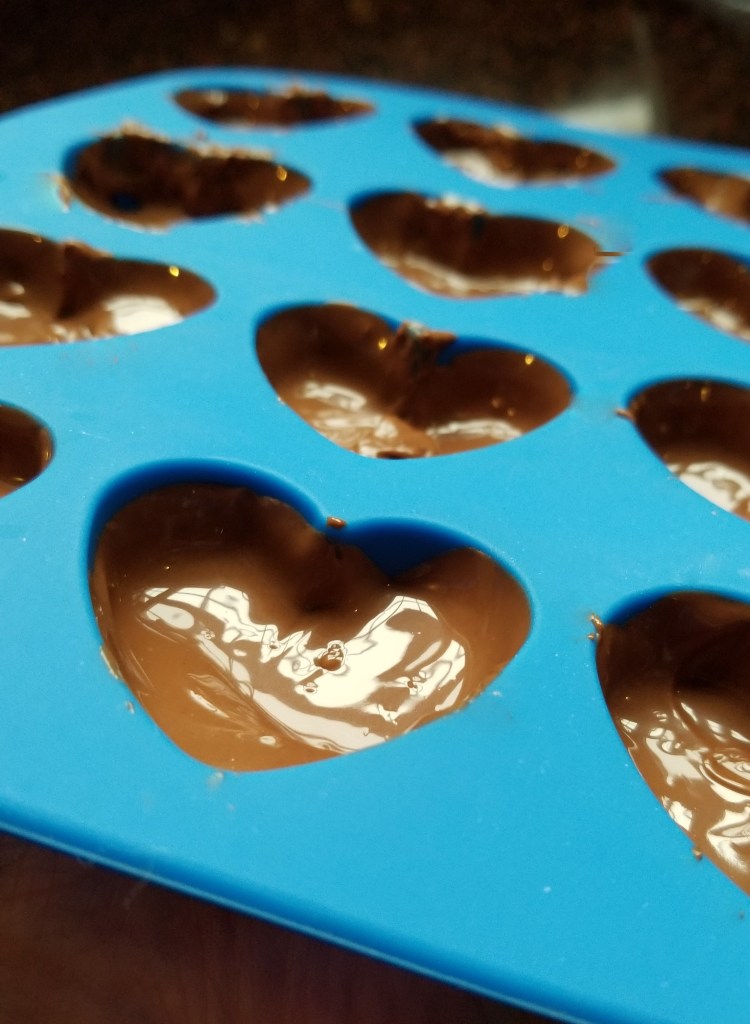
Place chocolate chips in a glass bowl over a pot of simmering water (I bring the water, about 4 cups depending on your pot, to a boil and then turn it down to a simmer) and stir till melted and smooth.  Be careful not to get any moisture in the chocolate – the kiss of death for chocolate. Working with one mold at a time fill each heart 1/3 of the way with chocolate and give the mold a couple of taps on the counter to release any air bubbles and ensure the chocolate is evenly distributed. 

Working quickly, use the brush to bring the chocolate up the sides of each mold to the edge.  If you don’t have a brush, you can use a small spoon and gently push the chocolate up the side. 

Place in the refrigerator on a flat surface for about 15 minute or until set.  You can keep the remaining chocolate warm on the stove on the lowest temp which will keep it smooth.  You can up the heat if you need to during the process.

While the chocolate sets, mix the peanut butter and powdered sugar together till smooth.  I used a mini food processor to avoid the powdered sugar going all over the kitchen.  A whisk is fine too.   Pour the peanut butter mixture into a small zip-top bag and work it to one corner before sealing.  Snip off the corner of the bag (a small snip).

Remove the set chocolate mold from the refrigerator and pipe peanut butter into each mold, in a heart shape, leaving room for more chocolate. 

Pour melted chocolate into each heart, to the top (if there is excess chocolate, you can use a straight edge knife or spatula to scrap it off and put it back into the chocolate on the stove). Give the mold a gently tap on the counter to release any air bubbles and make sure the chocolate fills in the spaces.

Place in the refrigerator for at least an hour to set.  Once you remove the peanut butter cups, you can decorate them with candy melts or serve them as is.  They keep for at least a week in an airtight container (and probably longer but they didn’t last that long in my house!).

Enjoy!

Buffalo Chicken Dumplings

You could put just about anything in a dumpling and I would be happy (the only non-negotiable exceptions are cilantro and mushrooms) so I’m always thinking about new fillings. Finger food is also important for my family as we plan what “snacks” we will have during football games and other sporting events. Chicken wings are one of our favorites. My husband and son like them plain but my daughter and I love spicy food so we opt for traditional buffalo wings with blue cheese dip on the side for me and ranch for her. We will of course have them for the Super Bowl this year but I wanted to take the flavors and see how they worked in a dumpling. There are great recipes for Buffalo Chicken dip, nachos, pizza, etc., So why not dumplings? I use egg roll wrappers and cut them into quarters but round or square dumpling wrappers would be great too. The filling is super simple – chicken, hot sauce, cream cheese and cheddar cheese – and you can either pan fry, deep fry or boil them. My daughter isn’t the biggest fan of blue cheese but if you like it, you can add a couple of crumbles of blue cheese to the mixture before you stuff the dumplings.

Ingredients

1/2 package cream cheese (I like Philadelphia), room temperature

2 cups shredded, cooked chicken (a rotisserie chicken is a perfect shortcut here)

4 tbs hot sauce (I like the traditional Frank’s Red Hot) or more if you like a real punch

2 tbs shredded cheddar cheese

6 – 8 egg roll wrappers cut in quarters or 2 – 3 dozen dumpling wrappers

Directions

Combine the cream cheese, chicken, hot sauce and cheddar cheese together until well mixed.

Fill each dumpling with a small spoonfull of filling and dab some water along the edges to seal the dumplings. You can do whatever folding shape you like!

There are lots of methods to cook them (boil, steam, etc.) but my favorite is pan frying them. Just place a few dumplings in a pan with some oil and fry till golden brown on the bottom.

Add a tablespoon or two of water and cover till the water has evaporated and the dumplings are cooked, about three minutes. You can add a bit more water if they need more time to cook depending on how large your dumplings are.

Serve them with blue cheese dip or ranch dressing. Enjoy!

Chicken Fried Rice

If I ask my son Jake what he wants for dinner, often he will ask for Benihana Fried Rice (before Covid-19 of course).  This kid could eat three bowls at the restaurant and then order one or two more to take home.  I always love watching the waiter/waitress’ expression when he orders five bowls of fried rice and the follow-up glance at me to see if I object.  Inevitably we have white rice (basmati) at least once during the week and there are always leftovers.  After the initial meal, white rice isn’t all that interesting and I hate wasting food so I figured if Benihana can make great fried rice, so can I. 

Leftover rice is critical for good fried rice.  Freshly cooked rice still has lots of moisture and letting the rice “dry out” in the fridge for a day or two makes all the difference.  Fried rice is also a great way to use up leftover chicken/shrimp/steak and whatever vegetables you have on hand.  Last night’s broccoli, one lone zucchini, half an onion and carrots that are almost past their prime? All are great in fried rice.  I went the traditional route with this version but feel free to have fun and customize it to whatever your family likes.

Ingredients

4 cups              Leftover cooked and chilled rice

3 tbs                 Canola or vegetable oil

3 tbs                 Light soy sauce

1 tsp                 Sesame oil

2                      Eggs, beaten

1 tbs                 Finely diced sweet onions

1 ½ tbs            Finely chopped carrots

1                      Chicken breast, cooked and diced (you can use shrimp, roast pork, beef or omit for vegetable fried rice)

                        Salt & pepper to taste  

Directions

In a large skillet, heat 1 tbs. oil and then scramble the eggs.  Transfer eggs to a plate and roughly chop them.  Add 1 tbs oil, onions and carrots to the same skillet, cooking till tender on medium low heat.  Once cooked, add chicken and heat for 2 minutes.  Add 1 tbs oil and rice, breaking up any large pieces and heating it through.  Add soy sauce and sesame oil, mix well and continue to cook, constantly mixing for 3 minutes.  Return the egg to the pan and mix well ensuring everything is combined.  Season with salt and pepper if necessary (I usually don’t since, the soy is salty but depending on your taste or the kind of soy you use, you can). Serve! 

Taco Tuesday – Shredded Chicken

I feel like I could write an entire book about #tacotuesday.  A Tuesday doesn’t go by in our home without tacos and if it does, it’s got to be a monumental event to derail Jake from eating tacos. 

Over the years, traditional ground beef and hard-shell taco shells have given way to lots of variations – soft shells, oven baked tacos, chicken, shrimp and different combinations.   I always make white rice and beans (I prefer black beans but Mark loves refried beans so guess what we have?) and corn that I cook on the stove on a low temp so it gets a bit charred and nutty flavor.   We (or should I say Grace and I) have started doing taco salads and taco bowls which, in my opinion, are the best of everything and I feel less guilty.  My eyes are always bigger than my stomach since I usually can’t finish my salad which is admittedly larger than it needs to be since I include virtually all the toppings. 

Speaking of toppings, we’ve got lots.  Cheese (cheddar for us), sour cream, salsa, chipotle sauce (Grace and I are obsessed), lettuce, diced tomatoes, avocados, radishes, pickled onions and jalapenos. I make my own pickled onions and jalapenos – they are easy to make and last for weeks in the refrigerator.  They are spicy with a little sweetness and the recipe is on my blog.   There will inevitably be more posts from future Taco Tuesdays as I am always looking for new ways to enjoy tacos! This is the recipe for Shredded Chicken (and ground beef) which is so simple I’m almost embarrassed to put this on paper but here it is. 

Shredded Chicken Tacos

I recently went with chicken for tacos instead of ground beef and it was great.  Personally, I needed something different since making the same thing every week gets old.  Super easy to make since the slow cooker does all the work and the chicken comes out moist and seasoned well.  If you want leftovers, three breasts gave us plenty for a salad and quesadillas the next day for lunch.  If you are planning to serve just for dinner, two breasts for three people should be enough since you really get a lot when you shred the chicken.    

Ingredients

2 or 3      Boneless, skinless chicken breasts or thighs (I would do four thighs)

½ cup    Water

4 tbs      Taco seasoning

1 tsp      Kosher salt

Directions

Sprinkle the taco seasoning and salt on both sides of the chicken and place in the slow cooker with ½ cup water. Cook on high for three hours.  Test to make sure the chicken is done – it should fall apart when you pick it up – and then shred it with two forks.   

Return the chicken to the slow cooker and set to Keep Warm until you are ready to serve.

(Note: When I make the beef for tacos it’s basically a pound of ground beef. I usually go with 85/15 so there is some fat in the mix for flavor.  Anything above 85 and it gets dry.  You could do ground turkey, too, but I wouldn’t use the super lean kind which would be dry.  I cook the meat in a pan with 4 tbs taco seasoning and ½ cup water.  I use a potato masher to break the meat up and once it’s cooked and most of the liquid has been absorbed, you are ready to go.)

One Pan Pasta Primavera

I love a one pan meal, especially lately as the start of the new year has been busy!  Easy clean up, of course, but I love the idea of adding more ingredients as it cooks and layering in flavors.  Stir fry is a perfect example, or fried rice and my all-time favorite is chicken and veggies with croutons.  And, you can pretty much put anything on a sheet pan.  So, with an abundant amount of cherry tomatoes recently, I came up with a One Pan Pasta Primavera recipe. Ok, so you need a pot to cook the pasta, but beyond that, everything cooks on one pan so I’m sticking with the name.  

The roasted tomatoes split open in the oven and release their juices which becomes the sauce.  I added shrimp, broccoli and some pesto to the pan and once everything was cooked, I combined with the pasta and topped with basil and parmesan (which makes everything delish).  During the summer, I buy big bunches of basil at our local farmers market and make a batch of pesto.  I pour it into ice cube trays and once the cubes are frozen, I transfer them to a zip top bag and use throughout the winter.  I can whip up pesto linguini with peas in 10 minutes, throw a few cubes into bolognese, and make chicken pesto paninis.  It’s a great short cut but you can always use your favorite store brand of pesto, too.

If shrimp is your preference, you could use chicken and swap out the broccoli for another vegetable. It was a huge hit with the family and I would consider making this for guests (someday when we actually have friends over again) because it’s an easy dish to pull together and I won’t need to stand at the stove instead of being with guests.

Ingredients

1 lb.                     Large shrimp (deveined and tails removed) (If frozen, defrost)

1 pkg                   Cherry tomatoes

3 cloves              Garlic, peeled and smashed

2 cups Broccoli florets, cut into small pieces

3 tbs                    Olive oil

1 tsp                    Seasoned salt

1/8 tsp                White pepper

2 tbs                    Pesto

1 lb.                     Short pasta (I used bow ties)

6                           Fresh basil leaves, cut into thin strips (aka chiffonade)

                             Freshly grated Parmesan cheese for garnish

Directions

Preheat your oven to 400.

Put cherry tomatoes on a sheet pan along with the garlic, olive oil, seasoned salt and pepper.  Lightly toss and roast in the oven till tomatoes start to pop/split and give off their juices, about 20 minutes. 

In the meantime, bring a pot of salted water to a boil and make the pasta according the package, till al dente.  Reserve a cup of the pasta water before draining.  Return drained pasta to the pot.

Remove the pan from the oven and prick any tomatoes that haven’t begun to pop/split.  The tomatoes will be soft so be careful not to be too aggressive moving them around or you will end of with mush. Add the shrimp and broccoli to the pan in a single layer with the tomatoes and return the pan to the oven for 10 minutes.  (I took the photo below and THEN realized I forgot the broccoli!)

Remove the pan and add the pesto, gently mixing it with the tomatoes and shrimp.  Place under the broiler for two minutes but keep a close eye on it so it doesn’t burn.

Remove the pan from the oven. Pour the tomato and shrimp mixture into the pot with the pasta and mix gently.  Transfer to a large bowl and top with the shredded basil and parmesan cheese.

Roasted Chipotle Carrots

I’m sure I’m not the only who gets tired of cooking, serving and eating the same thing over and over again. Don’t get me wrong, I want to make things my family likes but I need to shake things up once in a while. These roasted chipotle carrots are a great vegetable dish to slip into the rotation. And who doesn’t have extra carrots in their crisper drawer? Unless I am making soup, there are always a few in my refrigerator.

Peeling the carrots will take longer than anything else in this recipe (expect cooking, of course). Nothing fancy. The entire recipe is cut up carrots, sprinkled with a little salt, brown sugar and chipotle pepper on a sheet pan. They come out caramelized, tender with lots of crispy edges and tips. You can omit the chipotle if you like, or bump it up, but the tiny amount I use just gives these carrots great flavor and not much “heat.”

Ingredients

10 – 12               Carrots, peeled

2 tbs                    Olive oil

1 tsp                    Seasoned salt

¼ tsp                   Chipotle pepper powder

1 tbs                    Brown sugar

                             Maldon salt for garnish

Directions

Heat oven to 400.

Cut the carrots in half (if extra large you can cut them into quarters).  Put the carrots in a pile on a parchment paper lined cookie sheet and top with the salt and olive oil.  Mix and then spread out on the cookie sheet, faced down.  Sprinkle with the brown sugar and chipotle.

Cook until the carrots are fork tender, about 20 – 30 minutes.  Sprinkle with a pinch of Maldon salt and serve.

Apple Turnovers

One of the things I always have in my freezer is puff pastry.  In my opinion, puff pastry is one of those products that isn’t worth making because the store-bought version is so good.  Someday I will try my hand and see how it goes, especially since I’ve been watching bakers on The Great British Baking Show do it for years and think, “it can’t be that hard.”  But I know it is that hard so Pepperidge Farm is my go-to.  I make lots of things with puff pastry although my husband would like it if I came up with something to make every day.  My favorite way to use it is for turnovers and hand pies filled with fruit.  They are easy to make, puff up to a crispy cloud of buttery goodness and with just a few ingredients, and you can easily whip up a filling that is equally delicious. 

I usually have apples on hand and inevitably one or two are still left hanging out and in danger of getting overripe.   This filling is the perfect way to avoid wasting fruit.  For these I use honey crisp apples but any firm apple would work well. I would avoid super sweet ones like Delicious apples which can be too sweet and disintegrate while cooking.  And if you wanted to swap-out apple for other fruit, like peaches when they are in season, you certainly can.

My grandmother used to make these when I was a little girl and I remember waiting patiently for them to come out of the oven only to wait even longer for them to cool.  The filling is like molten lava right out of the oven so resist the urge to bit right into them or suffer the consequences!   

This filling is pretty much my go-to for gallates, mini-pies and hand pies.  I don’t always cook the filling for a larger apple pie but for the smaller ones, I always do to make sure the filling and crust are both cooked at the same time.   If you have any leftover filling, it’s great on ice cream too.  Once the turnovers are filled, a simple egg wash and a sprinkle of turbinado sugar finishes them off.  I love topping baked goods with turbinado sugar (aka Sugar in the Raw) since it doesn’t melt in the oven and gives the finished product a nice crunch and an elegant look.

Ingredients

3            Small – medium firm, apples (see note above)

1 tbs      Butter

¼ cup    Brown sugar, firmly packed

3 tbs      Water

1 tbs      Corn starch

1 tbs      Fresh lemon juice

1 tsp      Cinnamon

Pinch     Kosher salt

1            Egg, beaten with a little water for the egg wash

¼ cup    Turbinado sugar for the top of each turnover  

1 box    Puff pastry (each box has two packages/sheets; each sheet of pastry will make four turnovers)

Directions

Defrost the puff pastry according to the package directions.  I usually leave it on the counter while I am making the filling.

Preheat the oven to 400.

Peel, core and dice the apples. (I like a small dice for these, about ¼ inch.)  In a skillet, melt the butter and cook the apples on low for about 4 – 5 minutes.  Add the brown sugar, 1 tbs water, cinnamon and salt and cook till combined and the apples are fork tender, about another 4 – 5 minutes.  Dissolve the corn starch in the remaining two tablespoons of water and then add to the apples.  Mix well and bring to a gentle boil which will thicken the filling.  Once it boils, immediately remove the filling from the heat and let it sit till the dough is ready to fill.  You don’t want the filling to be pipping hot when you fill the dough or the butter in your dough will start to melt and make it difficult to work with.  You can put the filling in the freezer for two minutes if you want to speed up the cooling.

On a piece of parchment paper, unfold one package of pastry carefully.  If it isn’t pliable, it’s not defrosted enough and you risk ripping it along the crease.  I like to smooth the crease by putting another piece of parchment paper on top and lightly rolling the pastry with a rolling pin – don’t push too hard or you will kill the beautiful layers – but keeping the square shape.  Cut the pastry sheet into four squares, filling each one with a spoonful of the apple filling.  Brush the egg wash around the edges which will glue the sides together and fold over into a triangle. Gently seal the edges by pressing them together.  For some added insurance to avoid any leakage during cooking, you can use a fork and press down on the edges (I dip my fork in a little flour to avoid it sticking to the pastry). 

Transfer to a parchment lined baking sheet, cut a slit in the top to let the steam escape so the turnovers dont burst in the oven. Brush the top with the egg wash and sprinkle with the turbinado sugar.   Repeat with the other pastry sheet and you should have eight beautiful turnovers!

Bake at 400, rotating the pan once, till the turnovers have puffed up, are golden brown, about 20 minutes.  If there is some leakage, don’t worry, they will still taste amazing.  These are best served within an hour or two when you make them in my opinion but they will keep for a day or two and reheat well. Enjoy! 

Chicken Stock

So many of the things I make have chicken stock in the recipe.  I use it for soups, sauces, braising liquid, gravy and when some recipes call for water (like grits), I always use stock for added flavor.  There are some good store-bought stocks out there (Swanson is always in my pantry). (Note: regardless of which brand you like, buy the low sodium version since they can be very salty and throw off your dish if you are adding salt when you cook).   At least once a month I make a big pot of stock and then freeze it in quart containers.  They I always have it on hand and I control what’s in there, how much seasoning, etc.   From one large pot of stock, I get about 5 – 6 quarts of stock.  The unfortunate part is it never lasts a full month! 

The stock is filled with lots of veggies, herbs and of course chicken.  I use the basics – celery, carrots and onions – along with a parsnip, garlic and thyme, and lots of parsley.  No need to peel and chop everything since most of the solids get tossed after it’s done.  One trick I learned a few years ago was to use yellow onions – you know the ones with the dark yellow/brown skin – and throw them in peel and all.  The yellow peel not only adds flavor but color as well.

Since I make so many chicken dishes, I have lots of scraps and bones which are perfect for stock (like the tips of wings, bones from raw chicken).  I save them in a zip top bag in the freezer and when I’m ready to make stock, I toss them in.  Along with the scraps, I usually buy a whole chicken and cut it into pieces so it’s easier to handle when the stock is done.   Great stock needs lots of bones so throw in the neck that is usually in a bag with the chicken. In addition to the whole chicken, I throw in about a dozen wings which have lots of bones.  Bones are the key ingredient as they give off collagen and once you refrigerate your finished stock, you will see it is almost jello-like.  That’s the mark of a great stock.

The stock cooks for a few hours on the stove and makes the house smell amazing!  Once the chicken is falling off the bone (about three or four hours) you strain it and you’ve got stock.  I save as much of the chicken as I can and use it for chicken pot pie, casseroles, salad, tacos and of course soup.

Ingredients

1                           Chicken, Large (I use a roasting chicken as big as I can get, usually about 5 lbs.)

1 pkg                   Chicken wings, whole (small pkgs have about 10 – 12 wings which is perfect)

2                           Yellow onions, unpeeled, cut in half

2                           Parsnips, unpeeled

3                           Carrots, large, unpeeled, cut in half

3                           Stalks of celery, including the tops, cut in half

4                           Cloves of garlic, smashed

10                        Black peppercorns, whole

1 tbs                    Salt (Kosher)

1 bunch              Fresh flat leaf parsley

5 sprigs               Fresh thyme

3 stalks               Fresh dill

Directions

Place everything in a large pot (I use my Cuisinart 5-quart enamel pot) and cover with water.  As the stock cooks, it will form foam on top which you can skim off or cut a round piece of parchment paper to put on top of the water which eliminates the foam.  I usually cook for between three and four hours and when the chicken is falling apart, you know it’s done.  I remove as much of the solids as possible with a large slotted spoon or spider (a Chinese hand strainer) and for the rest, I pour the liquid into a colander lined with cheese cloth over a large pot.  I try to mush as much liquid as possible out of what is in the strainer and also from the solids I took out.  Don’t forget to save the chicken!

Pour into quart containers and bring to almost room temp before putting the tops on.  They will last in the refrigerator for a week and in the freezer for at least two months.  There will be a layer of fat on top when you defrost them or take them out of the refrigerator.   This fat has amazing flavor and is great in place of oil or butter in certain dishes.  I use it in place of oil in my matzoh balls.